Inside the Blog
Growing tomatoes in pots is one of the most rewarding garden projects you can take on, especially if space is limited to a sunny patio, balcony, or paved driveway. While tomato plants have a reputation for being easy to grow, container-grown plants are entirely dependent on you for water, nutrients, and root space.
In a traditional garden bed, roots reach deep into the ground to find moisture during dry spells. In a pot, those roots hit a wall. Getting great harvests comes down to understanding how container environments differ from ground soil and adjusting your routine to match.
Choosing the Right Variety for Pot Culture
Not every tomato plant adapts well to container life. Standard indeterminate varieties, which grow continuously until frost, can easily reach 6 to 8 feet tall. They develop massive root systems that outgrow typical patio pots within weeks.
For container success, look closely at the growth habit listed on the seed packet or plant tag.
| Tomato Type | Growth Habit | Best Container Size |
| Micro-Dwarf | 8 to 18 inches tall | 1 to 3 Gallons |
| Determinate | 3 to 4 feet, sets fruit once | 5 to 10 Gallons |
| Dwarf Tomato | 2 to 4 feet, sturdy dark foliage | 5 to 7 Gallons |
| Indeterminate | 6+ feet, continuous growth | 15 to 20+ Gallons |
Compact or Determinate Types
Determinate tomatoes stop growing once they hit a genetically determined height, usually between 3 and 4 feet. They bloom, set fruit over a short window of a few weeks, and then finish producing. Because their final size is predictable, they fit neatly into 5 to 10-gallon pots. Reliable choices include Roma, Celebrity, and Rutgers.
Dwarf and Patio Varieties
Breeding programs like the Dwarf Tomato Project have created short, sturdy plants with thick stems that yield full-sized slicer tomatoes. Varieties such as Patio F1, Dwarf Tomato Taste, and Tumbling Tom stay under 3 feet tall while producing excellent yields in smaller footprints.
Cherry Tomatoes
If you are new to container vegetable gardening, start with a cherry tomato. Varieties like Sun Gold, Sweet 100, or Black Cherry produce hundreds of fruits per plant. Their smaller fruit size makes them far less susceptible to blossom end rot and splitting compared to large beefsteak varieties.
Container Selection: Size, Material, and Drainage
The single most common reason container tomatoes fail is an undersized pot. Small pots dry out rapidly in summer heat, restricting root development and causing severe plant stress.
- Cherry Tomatoes: 5 Gallons minimum
- Slicer or Roma Types: 7 to 10 Gallons
- Beefsteak or Large Indeterminates: 15 to 20 Gallons
Container Materials
The material you choose affects how frequently you will need to water:
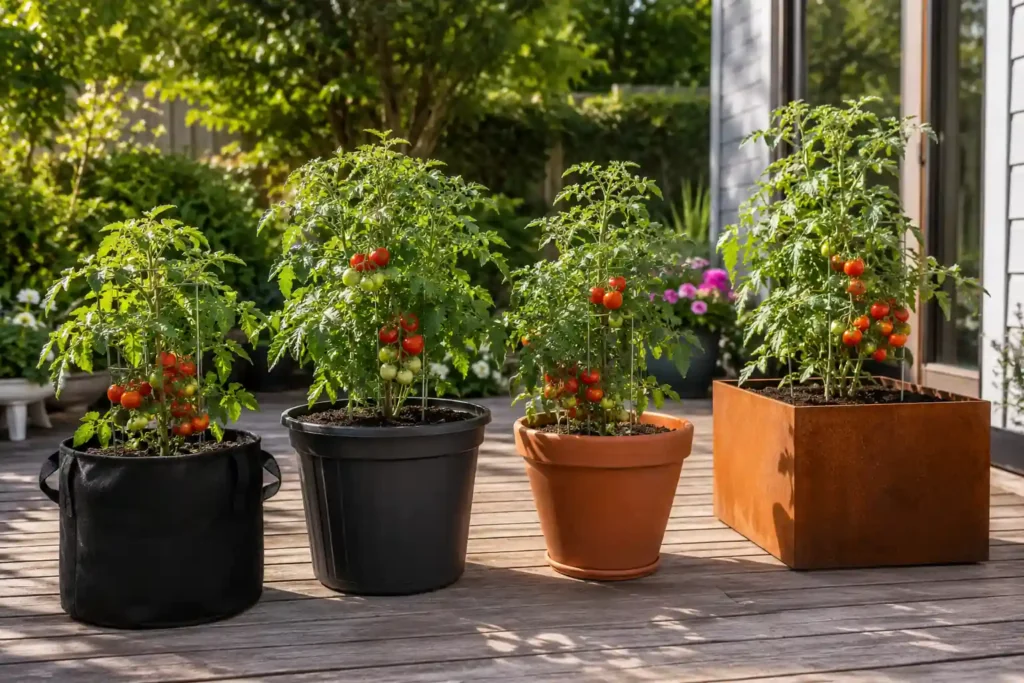
- Fabric Grow Bags: Highly recommended for tomatoes. They allow air to prune the roots, preventing root binding. The porous fabric releases excess heat, keeping root zones cooler on hot days.
- Plastic Pots: Lightweight, inexpensive, and excellent at retaining soil moisture. However, dark plastic pots absorb sunlight and can overheat roots if placed on concrete in direct afternoon sun.
- Terracotta: Classic and attractive, but unglazed clay wicks moisture out of the potting soil rapidly. You may end up watering twice a day during heatwaves.
- Metal Planters: If you want a more permanent, architectural look for a patio, our detailed review of corten steel planters details how metal containers retain heat and how to line them safely for edible crops.
Never skip drainage. A container without bottom drainage holes will trap water at the base, rotting the root system within days. Ensure there are multiple clear holes at the bottom before planting.
Soil Preparation: What Tomatoes Actually Need
Garden soil or topsoil should never go into a container. It packs down tight after a few waterings, suffocates roots, and holds onto too much water while draining poorly. It can also introduce soil-borne diseases like verticillium or fusarium wilt.
Always fill your pots with a lightweight, well-draining potting mix. A great blend for heavy-feeding vegetables like tomatoes includes:
- 60% Quality commercial potting mix (peat or coconut coir based)
- 20% Aged compost or worm castings for biological activity
- 10% Perlite or pumice to ensure steady aeration
- 10% Organic amendments like biochar. Incorporating biochar for houseplants and container crops helps hold water and beneficial microbes directly in the root zone without causing compaction.
When filling your container, leave two inches of space below the rim. This creates a basin that keeps water from washing away topsoil during heavy waterings.
Planting Deep: A Proven Root-Building Trick
When transplanting a tomato seedling into its final container, bury it deeper than it was growing in its starter pot. Tomatoes have the ability to sprout adventitious roots all along their buried stems.
- Pinch off the lower leaves, leaving only the top cluster of foliage.
- Dig a deep hole in your container mix.
- Set the stem into the soil so that two-thirds of the plant is buried beneath the surface.
This practice builds an expansive root network deep in the pot, helping the plant absorb water and nutrients efficiently throughout the season. If you are relocating plants or adjusting pot sizes, review our step-by-step guide on how to repot a plant without killing it to avoid disturbing sensitive root hairs.
Sunlight Requirements and Heat Management
Tomatoes are solar-powered plants. They require a minimum of 6 to 8 hours of direct, unfiltered sunlight each day to develop high sugar content and set fruit.
If your balcony receives less than six hours of natural light, fruit production drops sharply. In shaded urban setups, supplemental lighting can help during early spring growth, as detailed in our guide on whether plants need UV light and grow lamps.
Managing High Temperatures
Direct sun is essential, but container roots dislike extreme heat. When air temperatures cross 90°F (32°C), soil inside dark pots sitting on concrete can easily reach 100°F (38°C). At these temperatures, root function shuts down, flowers drop off without setting fruit, and leaves curl up to preserve moisture.
To protect your plants during heatwaves:
- Elevate pots off hot concrete surfaces using plant risers or wooden caddies.
- Shade the sides of dark containers while keeping the top foliage in full sun.
- Apply a 1-inch layer of straw or wood-chip mulch across the top of the soil to reduce surface evaporation.
Mastering Container Watering routines
Inconsistent watering causes the majority of container tomato problems. In peak summer heat, a large tomato plant can pull several quarts of water out of the soil every day.
Watering Check: Insert your finger 2 inches deep into the soil. If it feels dry, water thoroughly until liquid flows freely from the bottom drainage holes. If it feels moist, check back in the evening. Avoid frequent, shallow surface sprinklings.
When soil swings repeatedly between bone-dry and soaking wet, two main issues show up:
When soil swings repeatedly between bone-dry and soaking wet, two main issues show up:
Blossom End Rot
This appears as a dark, leathery spot on the bottom of developing fruit. It is often blamed on a lack of calcium in the soil, but in containers, the root cause is almost always irregular watering. Calcium is moved through the plant via water uptake. When the soil dries out, calcium transport stops, leading to cell wall breakdown in young, fast-growing fruit.
Fruit Splitting and Cracking
If a tomato plant experiences a dry spell followed by a heavy soaking, the inside of the fruit absorbs water faster than the outer skin can expand. The skin splits open, inviting insects and fruit rot. Consistent, daily watering schedules prevent this entirely.
To prevent common watering mistakes across all your gardening projects, check out our guide on 5 common plant care mistakes beginners must avoid.
Feeding Schedule for Heavy Producers
Potting soils contain a limited supply of nutrients that wash out through the bottom drainage holes with every thorough watering. Tomatoes are heavy feeders, especially once they transition from vegetative growth to flowering and fruiting.
- Weeks 1 to 3 after planting: Apply a balanced organic fertilizer (such as 5-5-5 or fish emulsion).
- When first flowers appear: Switch to a low-nitrogen, high-potassium and phosphorus mix (such as 3-4-6).
- Every 10 to 14 days: Apply diluted liquid fertilizer throughout the main harvest season.
Avoid heavy applications of high-nitrogen lawn fertilizers. Excessive nitrogen creates lush, dark green foliage and massive vines, but yields very few flowers and fruit.
Support Structures and Pruning
Even dwarf and determinate varieties get heavy once laden with ripening fruit. Strong winds on elevated balconies can easily knock over unsupported pots or snap heavy main stems.
Set up your supports at planting time. Inserting tomato cages, stakes, or bamboo tepees into an established pot later on will sever major roots.
Pruning Guidelines
- For Indeterminate Tomatoes: Pinch out “suckers”, the small shoots that sprout in the 45-degree angle where a leaf branch meets the main stem. Restricting the plant to one or two main stems keeps growth manageable in a pot.
- For Determinate Tomatoes: Do not prune suckers. Determinate varieties produce their flowers and fruit on those side branches. Cutting them off reduces your total yield.
- Bottom Pruning: For all container tomatoes, trim off any leaves on the bottom 6 to 12 inches of the stem once the plant reaches 2 feet tall. This improves airflow around the base and prevents soil-borne fungal spores from splashing onto the foliage during watering.
Integrating Containers into Your Patio Layout
If you are setting up an outdoor living space, tomatoes pair well with herbs like basil, parsley, and marigolds in mixed pot displays. You can incorporate heavy containers into dedicated seating areas using structured planters. Learn how container depth affects plant root health in our guide to choosing or building the perfect planter bench.
Frequently Asked Questions
Can I grow tomatoes in a standard 5-gallon hardware store bucket?
Yes. 5-gallon buckets work well for cherry tomatoes and dwarf varieties. Before planting, drill at least 5 to 6 half-inch drainage holes in the bottom of the bucket. Food-grade buckets are preferred to ensure no chemical leachates enter the soil.
Why are my container tomato blossoms falling off without making fruit?
Blossom drop occurs when daytime temperatures exceed 90°F (32°C) or night temperatures drop below 55°F (13°C). Extreme heat damages pollen, rendering flowers infertile. High humidity and a lack of air circulation can also prevent proper pollination. Gently shaking the main stem once a day helps move pollen inside the flowers.
Should I put gravel or rocks in the bottom of my pot for drainage?
No. Adding a layer of gravel at the bottom actually raises the perched water table inside the pot, bringing saturated soil closer to the plant roots. Use high-quality potting mix from top to bottom and rely on the container’s drainage holes to release excess water.