Inside the Blog
The first Swedish ivy I ever owned came as a cutting from a neighbor. She snipped off a small stem, dropped it into a glass of water, and handed it to me like it was nothing. Three weeks later I had roots. Three months after that I had a full, trailing plant spilling over the edges of a terracotta pot on my kitchen shelf. That experience told me everything I needed to know about this plant. It is generous, fast-growing, and genuinely hard to get wrong once you understand a few basic things about what it needs.
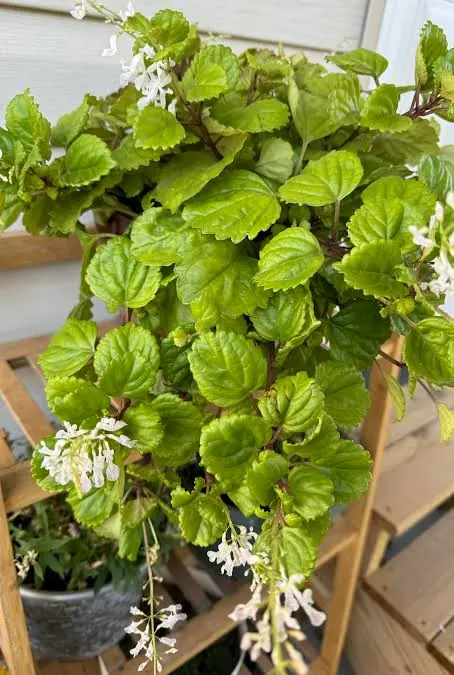
Swedish ivy, known botanically as Plectranthus verticillatus, is not a true ivy at all. It belongs to the mint family and originates from parts of Africa and Australia, not Scandinavia despite the common name. What it shares with traditional ivy is that same satisfying trailing habit, long stems that cascade over pot edges or hang gracefully from a basket. The leaves are rounded, slightly waxy, and a bright cheerful green that holds its color well indoors throughout the year. Some varieties have a purple tint to the undersides of their leaves, which adds a nice visual detail when the plant is hung at eye level.
One thing worth knowing before anything else: Swedish ivy is non-toxic to cats and dogs. For pet owners who have been burned before by beautiful plants that turned out to be dangerous, that is genuinely good news.
Getting the Light Right for Swedish Ivy
Swedish ivy does best in bright, indirect light. A spot near an east or north-facing window works well in most US homes, giving the plant consistent light without the intensity that a south or west-facing window delivers at peak hours. If direct afternoon sun hits the leaves regularly, you will start to see them bleach or develop dry, papery patches along the edges.
That said, this plant handles lower light better than a lot of trailing houseplants. It will survive in a dimmer corner, though the growth will slow down and the stems tend to get a little leggy over time, reaching toward whatever light source is available. If your plant starts looking stretched and sparse, moving it to a brighter spot for a few weeks usually sorts it out quickly.
Grow lights work well for Swedish ivy if natural light is limited. A full-spectrum bulb positioned a foot or two above the plant for 12 hours a day keeps it looking as full and healthy as it would in a naturally bright room.
How to Water Swedish Ivy Without Overwatering It
Watering is where most people go wrong with this plant, and overwatering is almost always the issue. Swedish ivy likes consistent moisture during the growing season but it does not want to sit in soggy soil. The roots need air as much as they need water, and waterlogged conditions lead to root rot faster than you might expect.
The approach that works best is to check the top inch or two of soil before watering. If it still feels damp, leave it alone. If it feels dry to the touch, water thoroughly until it drains from the bottom of the pot, then let the excess drain away completely before returning the pot to its spot. Never let the pot sit in a saucer of standing water.
During spring and summer, most Swedish ivy plants need watering every 5 to 7 days depending on the temperature and humidity in your home. In fall and winter, growth slows down significantly and the plant needs far less. Stretching waterings out to every 10 to 14 days through the cooler months is usually the right move. Going by the soil rather than the calendar is always the more reliable approach.
Soil and Potting for Healthy Roots
Swedish ivy is not particularly fussy about soil, but it does need a mix that drains well. A standard indoor potting mix works fine as a base. Adding a handful of perlite improves drainage and reduces the risk of the soil staying wet for too long after watering. Avoid dense, heavy soils that compact easily, as these hold moisture against the roots and create the conditions that lead to rot.
Always use a pot with drainage holes. This is non-negotiable for Swedish ivy. Without drainage, excess water has nowhere to go and root problems follow. Hanging baskets and standard terracotta pots both work well. Terracotta is particularly good because it is porous and allows the soil to dry out more evenly between waterings.
Repot every one to two years in spring when you notice roots appearing from the drainage holes or circling the surface of the soil. Move up just one pot size at a time. Going too large means more soil volume, more retained moisture, and a higher chance of overwatering problems.
Temperature and Humidity Indoors
Swedish ivy is comfortable in the same temperature range that most people keep their homes. Somewhere between 60 and 75 degrees Fahrenheit is ideal. The plant does not tolerate cold drafts well, so keep it away from air conditioning vents in summer and drafty windows in winter. Temperatures below 50 degrees Fahrenheit stress the plant noticeably and sustained cold can cause real damage.
Humidity is one area where Swedish ivy is more flexible than many tropical houseplants. It handles average indoor humidity reasonably well, which is useful in winter when forced air heating dries homes out significantly. That said, it does appreciate a little extra moisture in the air. Grouping it near other plants, running a small humidifier nearby, or misting the leaves occasionally during dry winter months all help it look its best through the season.
Feeding Your Swedish Ivy Through the Growing Season
Swedish ivy is a fast grower and benefits from regular feeding during spring and summer. A balanced liquid fertilizer diluted to half the recommended strength every two to four weeks gives it what it needs to produce full, lush growth. Feeding too heavily or too often can cause salt buildup in the soil, which shows up as brown leaf edges over time.
Stop feeding in fall and if you do feed at all during winter, once a month at most is enough. The plant is not actively growing much during the cooler months and heavy feeding when growth is slow does more harm than good. If older leaves start to look pale or yellowish despite good light and proper watering, it is often a sign that the plant is ready for the growing season feed to begin again.
Pruning and Pinching to Keep It Full
Left to its own devices, Swedish ivy will grow long trailing stems that look beautiful in a hanging basket but can start to look thin and bare near the base of the plant over time. Regular pinching solves this completely. Pinching simply means using your fingers or a pair of clean scissors to remove the growing tip at the end of each stem, just above a leaf node.
Doing this every few weeks during the growing season encourages the plant to branch out from that point, creating a fuller, bushier shape rather than a few long sparse vines. The stems you remove are not wasted. They root easily in water or moist soil and make excellent new plants to keep or share.
Do not be shy about cutting back stems that have gotten too long or look leggy. Swedish ivy bounces back from hard pruning without any drama, usually pushing out fresh new growth within a couple of weeks.
How to Propagate Swedish Ivy
Propagating Swedish ivy is one of the easiest propagation tasks in houseplant care. Take a stem cutting around 4 to 6 inches long, cutting just below a leaf node. Remove the leaves from the bottom half of the cutting so that no foliage sits below the waterline or below the soil surface.
Place the cutting in a glass of water on a bright windowsill, changing the water every few days to keep it fresh. Roots typically appear within two to three weeks. Once the roots are an inch or two long, pot the cutting into a small container with moist potting mix and treat it like a mature plant from that point forward.
You can also root cuttings directly in moist soil if you prefer to skip the water propagation step. Keep the soil consistently moist and the cutting in bright indirect light until you feel resistance when you gently tug the stem, which tells you roots have established.
Common Swedish Ivy Problems and How to Fix Them
Leggy, sparse growth almost always comes down to insufficient light. If your Swedish ivy is producing long stems with wide gaps between the leaves, it is stretching toward a light source. Move it to a brighter spot and start pinching the stem tips to encourage bushier growth from the base.
Yellow leaves paired with wet, heavy soil point to overwatering or poor drainage. Let the soil dry out more between waterings, check that the pot drains freely, and remove any leaves that are already fully yellow. If the problem has progressed to root rot, which you can identify by mushy dark roots and a sour smell from the soil, remove the plant from the pot, trim away the affected roots, and repot into fresh dry mix.
Spider mites, mealybugs, and aphids occasionally show up on Swedish ivy, particularly in dry indoor conditions during winter. Checking the undersides of leaves regularly means catching problems early when they are easy to deal with. A spray of diluted neem oil or insecticidal soap applied weekly for two to three weeks clears up most pest issues without harming the plant.
The Honest Truth About Swedish Ivy
Swedish ivy is one of the more rewarding plants you can keep indoors. It grows quickly enough that you see results, it trails beautifully in a hanging basket or on a high shelf, and it propagates so easily that you are never far from being able to start a new plant or share one. The care routine is not complicated once you get the watering right, and the plant is forgiving enough that the occasional mistake does not set it back permanently.
Get the light and watering right, pinch it back regularly to keep it full, and you will have a plant that looks genuinely impressive without demanding much of your time. That is a good deal for any houseplant.
Frequently Asked Questions About Swedish Ivy Care
Is Swedish ivy easy to care for indoors?
Swedish ivy is one of the easier trailing houseplants to keep indoors. It tolerates a range of light conditions, grows quickly in the right spot, and bounces back well from occasional watering mistakes. The main thing to get right is not overwatering. Once you have that dialed in, the rest of the care routine is straightforward and low maintenance.
How often should I water my Swedish ivy?
During spring and summer, check the soil every few days and water when the top inch feels dry, which usually works out to every 5 to 7 days. In fall and winter, slow down significantly and water only every 10 to 14 days. The exact frequency depends on your home’s temperature, humidity, and how much light the plant receives, so always go by the soil rather than a fixed schedule.
Why is my Swedish ivy getting leggy and sparse?
Leggy growth is almost always a light issue. Swedish ivy stretches toward light when it is not getting enough, producing long stems with large gaps between leaves. Move the plant to a brighter spot with indirect light and start pinching back the stem tips regularly. Within a few weeks you should see fuller, denser growth coming in from the base.
Can I propagate Swedish ivy in water?
Yes, and it is one of the easiest plants to propagate this way. Take a 4 to 6 inch stem cutting, remove the lower leaves, and place it in a glass of water in a bright spot away from direct sun. Change the water every couple of days to keep it fresh. Roots typically appear within two to three weeks, at which point you can pot the cutting into soil.
Is Swedish ivy safe for cats and dogs?
Swedish ivy (Plectranthus verticillatus) is considered non-toxic to cats and dogs, which makes it a good option for pet owners who want trailing houseplants without the worry. That said, any plant can cause mild stomach upset if eaten in large quantities, so it is still worth keeping it out of easy reach of pets that like to chew on foliage.
Why are my Swedish ivy leaves turning yellow?
Yellow leaves on Swedish ivy are most commonly caused by overwatering or waterlogged soil. Check the drainage on your pot and let the soil dry out more between waterings. Less commonly, yellowing can result from insufficient light or the plant simply shedding its oldest leaves as it grows. If yellowing is widespread and the soil smells sour, check the roots for signs of rot and repot into fresh mix if needed.
How do I make my Swedish ivy bushier?
Pinching back the stem tips regularly is the most effective way to encourage a bushy, full plant. Every time you pinch off a growing tip just above a leaf node, the stem branches out from that point rather than continuing in a single direction. Doing this every two to three weeks during the growing season makes a noticeable difference in the plant’s overall shape and density within a month or two.
Does Swedish ivy flower indoors?
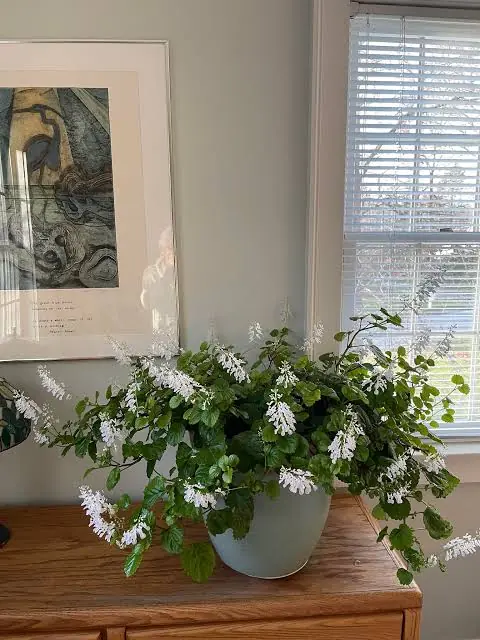
Swedish ivy does produce small flowers, typically tiny white or pale lavender blooms that appear on upright spikes. They are modest rather than showy, but they are a pleasant bonus when they appear, usually in late summer or fall. Good light and consistent feeding during the growing season make flowering more likely. Some growers pinch off the flower spikes to direct the plant’s energy back into foliage growth, which is a reasonable approach if you are growing it primarily for its trailing leaves.